Hello, G45ers!
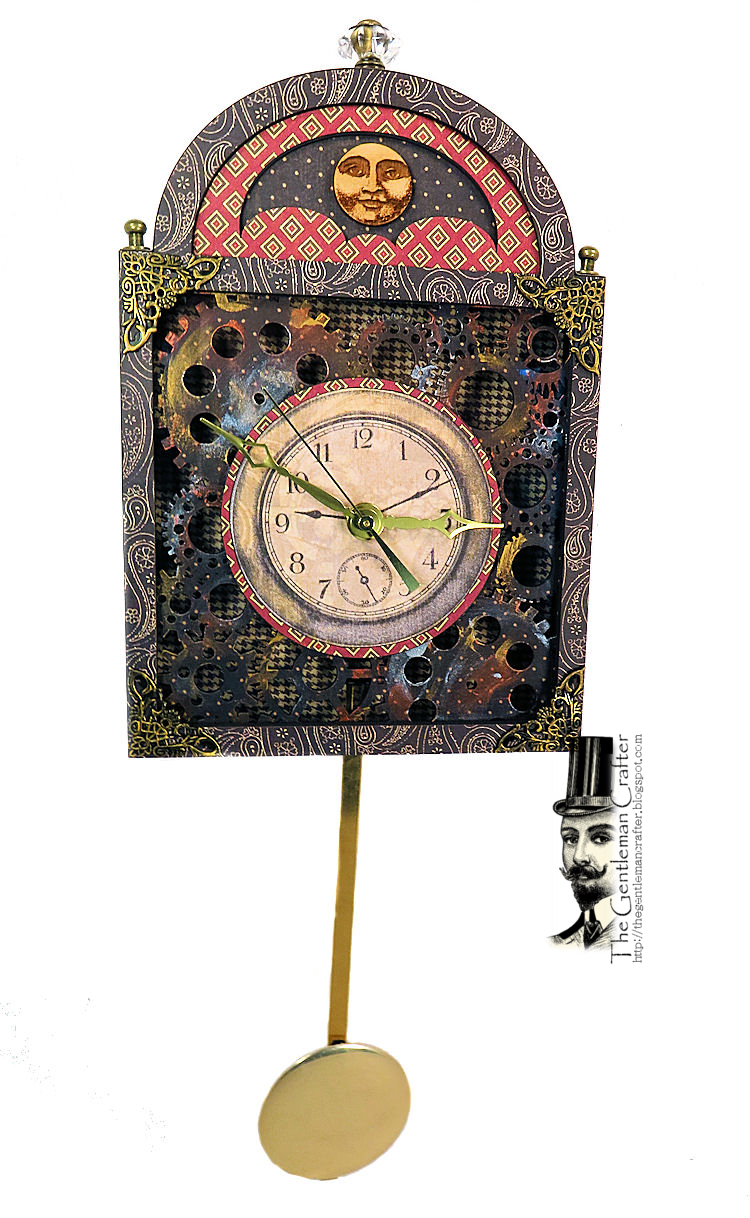
Get ready to make some noise for G45 Brand Ambassador with southern charm and genius paper crafting engineer, Jim Hankins – The Gentleman Crafter! For Jim's #G45Selfie project he has created a DIY Pendulum Clock and provides a printable tutorial, along with SVG and PDF files so you too can create your own clock. This handsome clock has been created with our A Proper Gentleman – Deluxe Collector’s Edition and Black 12×12 Chipboard Sheets, but feel free to grab whichever paper would best match your home decor and let's get started!
The Gentleman Crafter – USA
2019-2020 Brand Ambassador
“Full of Southern charm, Jim Hankins is truly a Gentleman Crafter! Jim is known for creating intricate 3-D art projects using innovative mixed media techniques.
A blogger, YouTuber, and educator at large, Jim loves traveling the country and internationally, teaching classes online and in person by reaching out to fellow crafters to share his love of creating special projects.
“I’m the Father to two Neapolitan Mastiffs that are a HUGE part of my life- in more ways than one- and a cat named Bella out on a farm in Granger, Texas. I love to use my hands to create anything! Ever since I was very young there was nothing that made me happier than to make something. There is nothing I love better than sitting down with a fresh roll of Scor-tape and some chipboard! You never know what will happen! “
Jim is currently retired from the corporate world and runs an online business from his studio in Texas. You can see Jim's work on his website at: http://www.TheGentlemanCrafter.com
Graphic 45 Self Portrait- The Pendulum Clock
By Jim R. Hankins The Gentleman Crafter
Copyright 2019
Please take a moment to read through the Printable Tutorial first before creating the project. I hope you enjoy making the clock!
This tutorial is accompanied by a set of five .SVG files for your digital cutter. If you do not have a digital cutter use the .PDF files to trace around the template pieces and cut out.
Things Needed:
|
|
|
Graphic 45 Supply List:
Other Supplies:
Let’s get started!
Making the Clock Base-
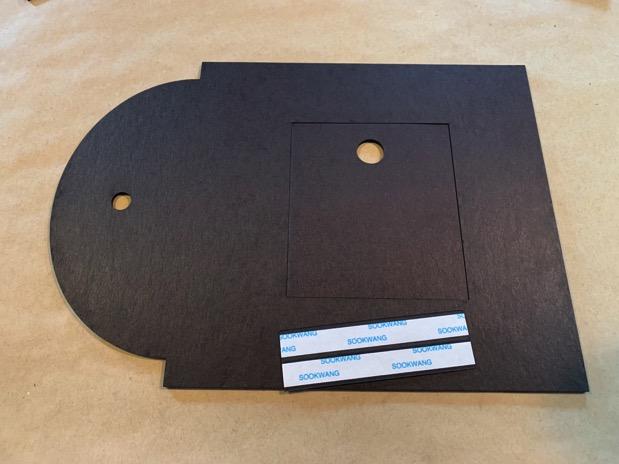
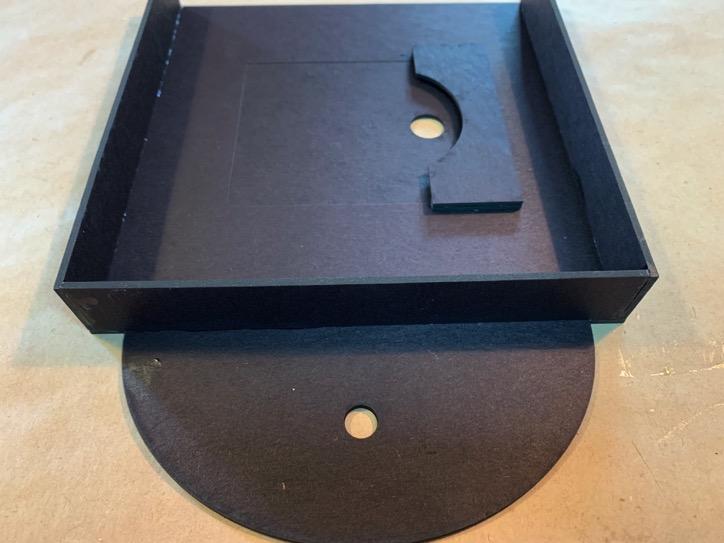
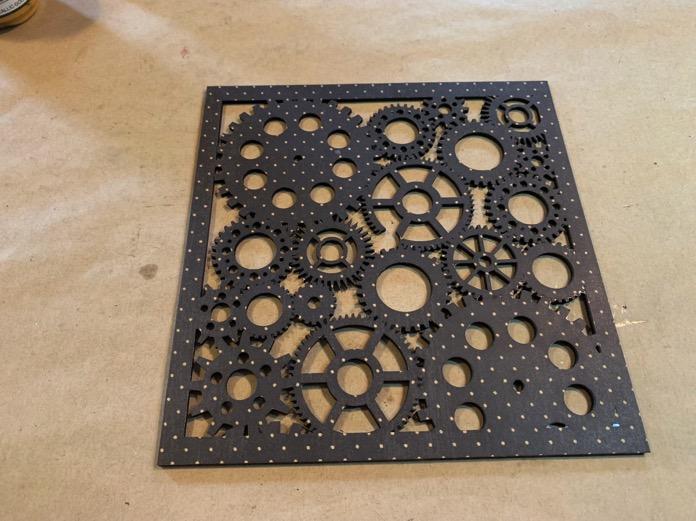
Please cut the following from chipboard using either the .PDF or .SVG files:
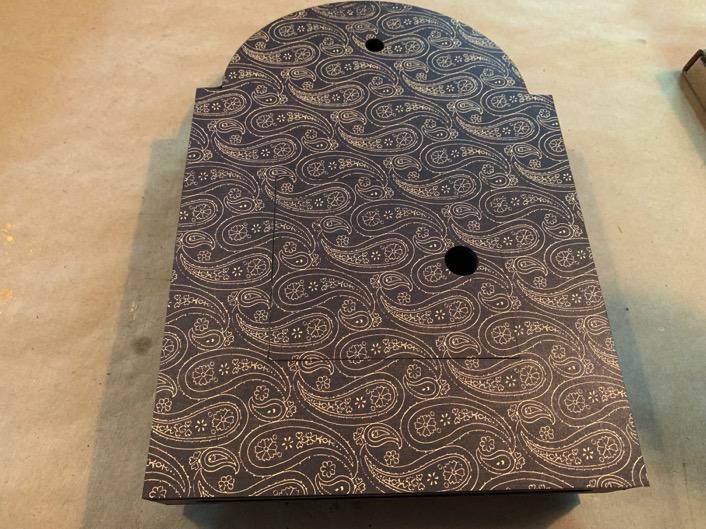
(1) Clock Back and Door
(2) Left/ Right Sides – 1 x 7-1/8-inch
(1) Top Piece- 1 x 6-5/8-inch
(1) Bottom Piece- (Opening in Center) 1 x 6-5/8-inch
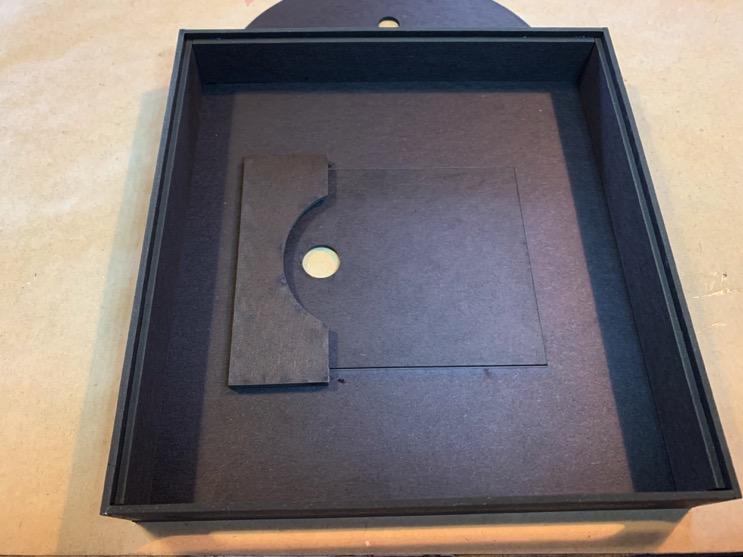
(2) Left/Right Interior Risers – 7/8 x 6-7/8-inch
(1) Top Interior Riser – 7/8 x 6-3/8-inch
(3) Top Support Pieces – 1 x 1-inch
(1) Magnet Holder
(1) Magnet Holder Riser
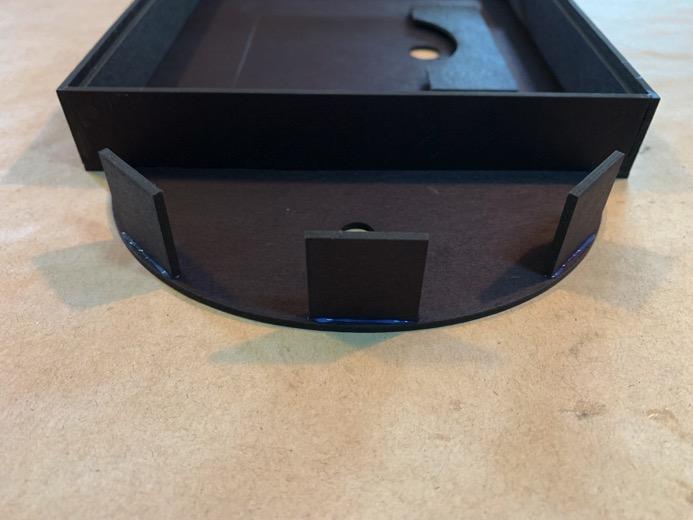
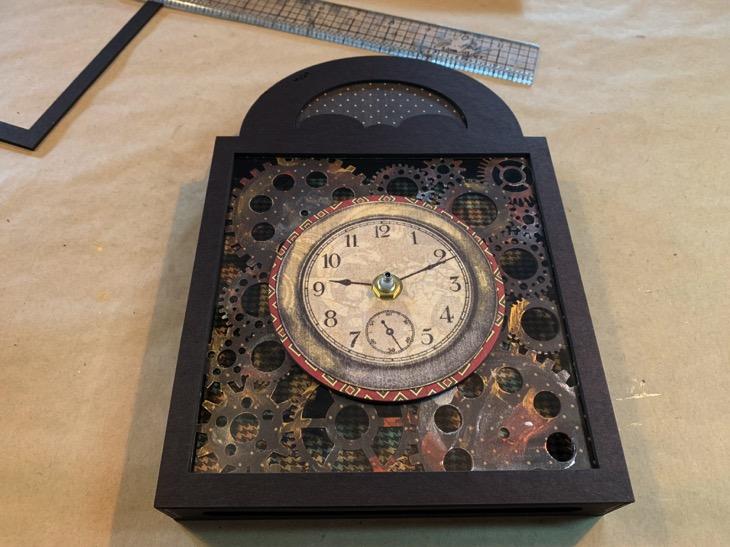
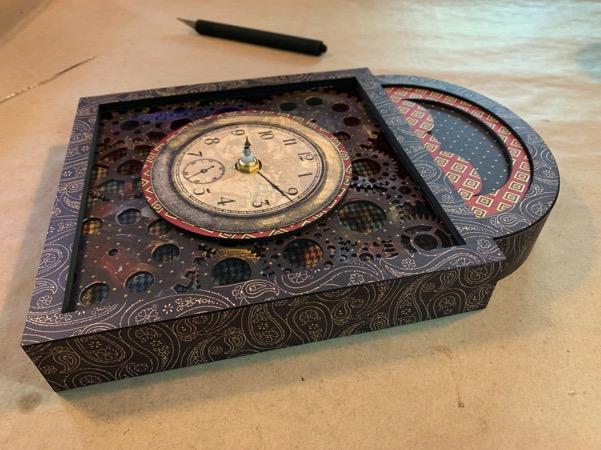
(1) 4-inch Diameter Circle (3/8-inch circle cut from the center)
(1) Gear Background
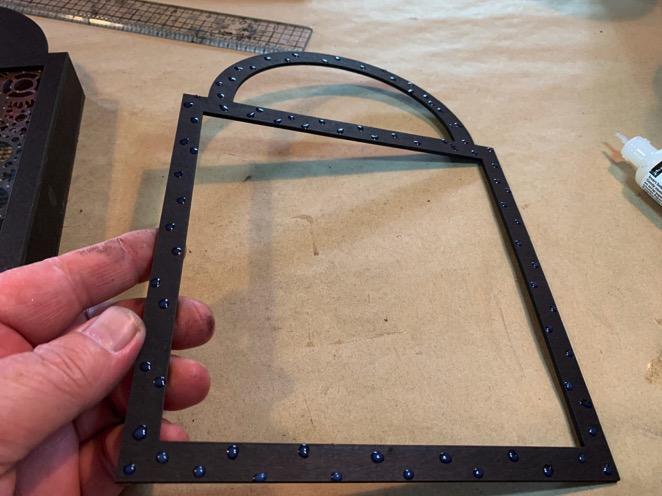
(1) Clock Front Piece (Scalloped opening at top)
(1) Clock Front Frame
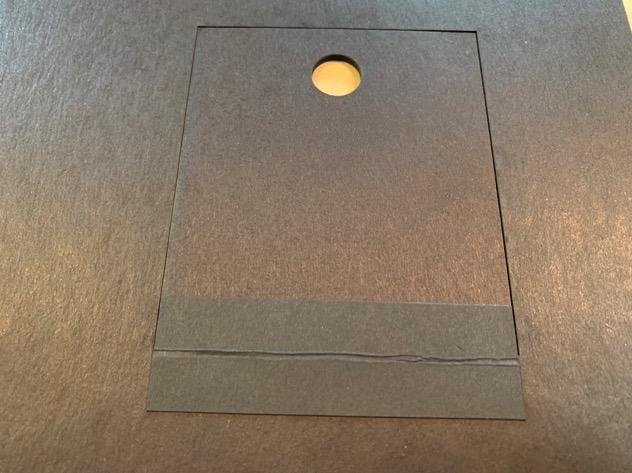
Cut a 1 x 3-1/4-inch piece of coordinating cardstock. Score down the length at ½-inch and adhere Scor-Tape or similar to each side of the score line.
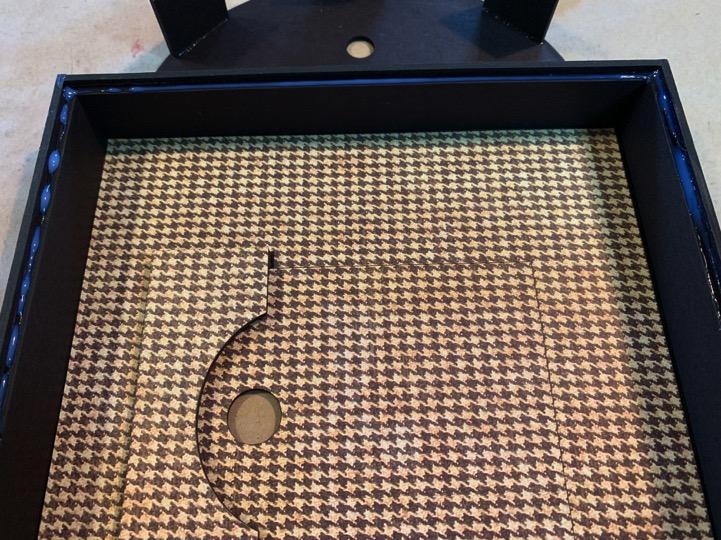
Place the back door piece into it’s matching opening on the back of the clock piece.
Pull the tape backing from both sides and adhere the strip onto the door and the clock pack with the scored line in the center of the door/clock seam.
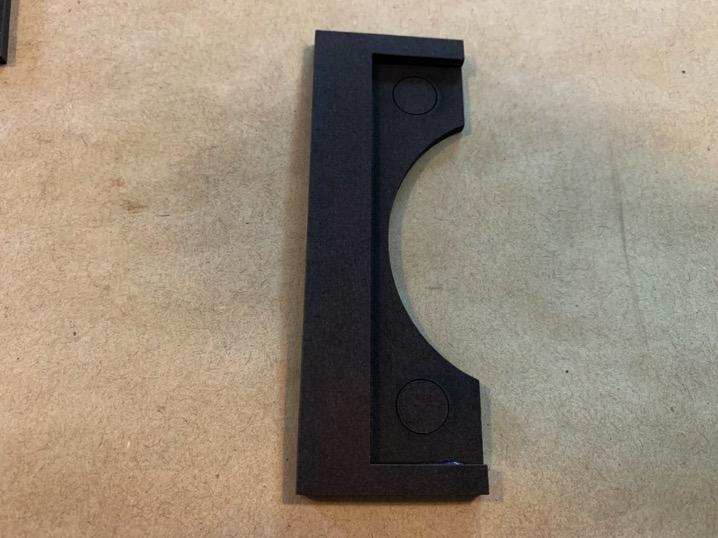
Turn the back piece over to the interior side. Find the Magnet Holder and the Magnet Holder Riser and adhere the riser on top of the holder. Straight sides flush together.
Apply glue to the top side of the magnet riser and adhere flush with the opening of the door on the interior side.
Pull the (2) 1 x 7-1/8-inch Left/Right Side pieces and apply glue to the long side and adhere on top of the left long side of the clock flush with the edge. Repeat for the opposite side.
Apply glue to the left, right and bottom edge of the 1 x 6-5/8-inch Top Piece and adhere onto the clock interior front and in between the two long Left/Right Sides. Next, repeat the same steps above with the 1 x 6-5/8-inch Bottom Piece- (Opening in Center) adhering it to the bottom of the clock.
Find the (2) 7/8 x 6-7/8-inch Left/Right Interior Risers and the (1) 7/8 x 6-3/8-inch Top Interior Riser. Apply glue to the backsides of the longer pieces and adhere to the interior existing sides of the left and right sides. Last, adhere the shorter 7/8 x 6-3/8-inch Piece to the interior top wall in between the (2) longer risers. This will give us edges to adhere to the Gear Background to.
Find the (3) 1 x 1 chipboard pieces and apply glue to one side. Adhere one of the pieces to the top center. Adhere the remaining two pieces to the opposite sides of the centerpiece. Make sure you do not go over the edges when you adhere these.
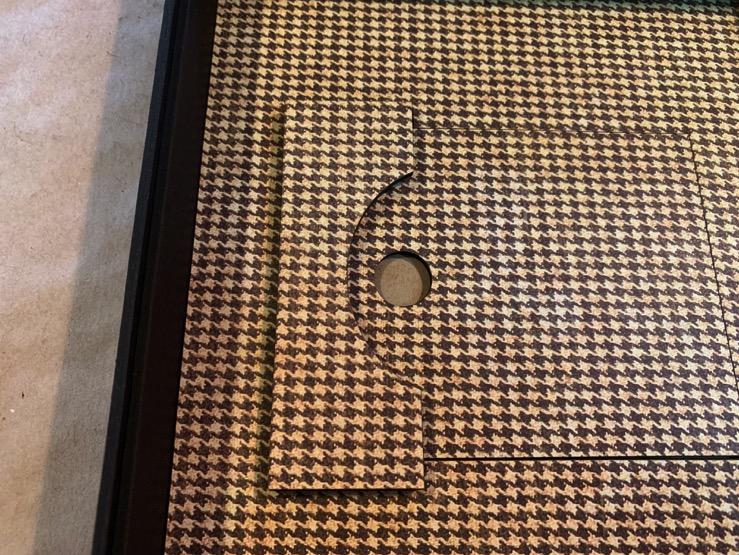
“A Man About Town” -Houndstooth:
Clock Interior Back, Clock Interior Door, Clock Interior Magnet Holder
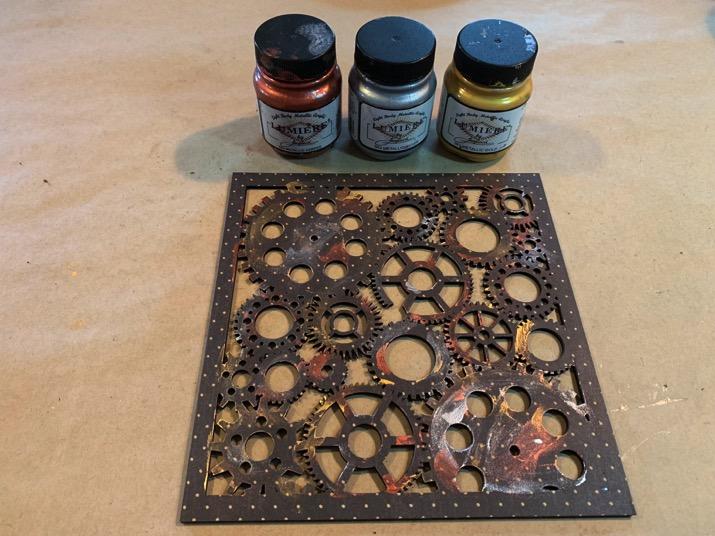
“Mad About Plaid” –Brown Dot
Adhere to chipboard Gear Background
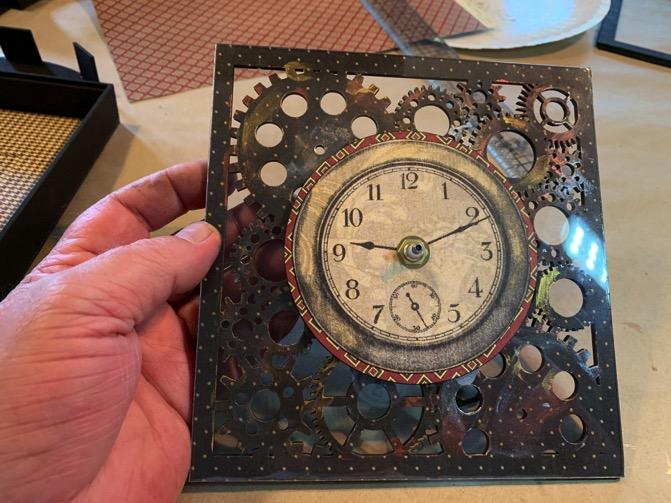
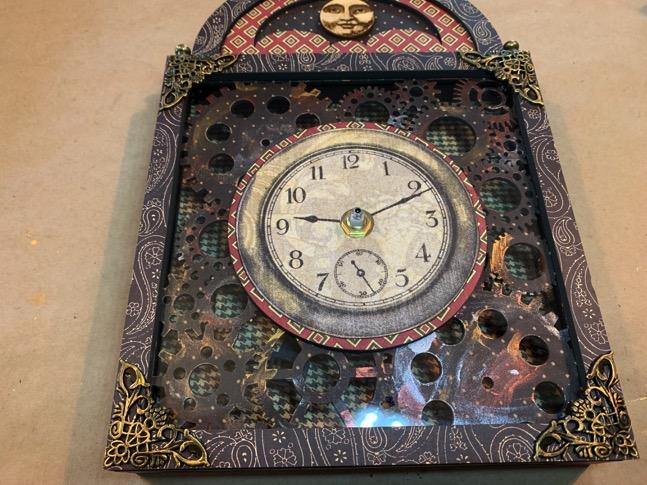
“Timely Point of View” – Pocket Watch
Fussy cut the largest pocket watch without the stem…just the circular part. Cut the center hole out to 3/8-inch.
“Haberdasher” – Red Paper with Diamonds
Clock Face Background
After you have adhered the above papers to the chipboard pieces, adhere the Fob watch or the pocket watch to the center of the chipboard covered clock face.
For the gear background, you may choose to leave it as is or you can dab/rub metallic paints over some of the areas of the paper to give it a pop.
From Acrylic cut a 6-5/8 x 6-7/8-inch piece. Cut a 3/8-inch hole from the center.
Adding the Clock Movement:
You can either use a clockwork kit with or without a pendulum. You can purchase these if the craft wood section of your craft store. Pull the parts from the kits and take care not to lose any of the little parts.
Place the acrylic sheet on top of the gear background and feed the clock stem up through the hole. Apply glue to the backside of the clock face. Place the patterned paper covered clock face on top of the acrylic and down onto the clock stem. Place the brass washer down onto the stem and the screw on the brass nut to secure the clock to the face.
Apply glue to all the interior risers and place the clock face assembly down onto the glued edges to adhere.
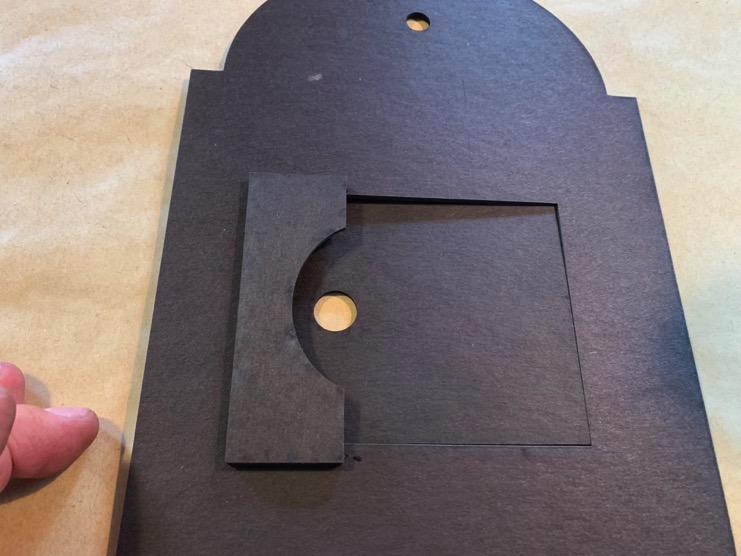
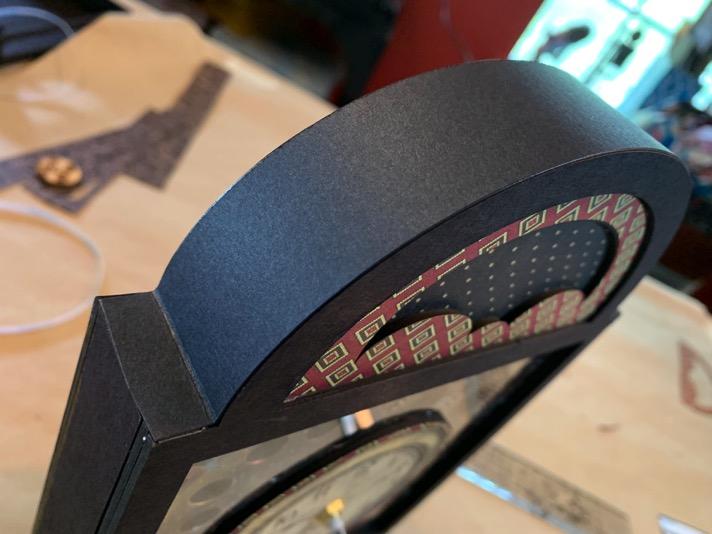
Find the Scalloped cut out Front piece. From “Mad About Plaid” –Brown Dot paper cut the half-circle piece and adhere to the backside of the Scalloped cut out Front piece.
Apply glue or tape to the backside of the Scalloped Front piece and adhere to clock front as well as the (3) 1-inch pieces at the top.
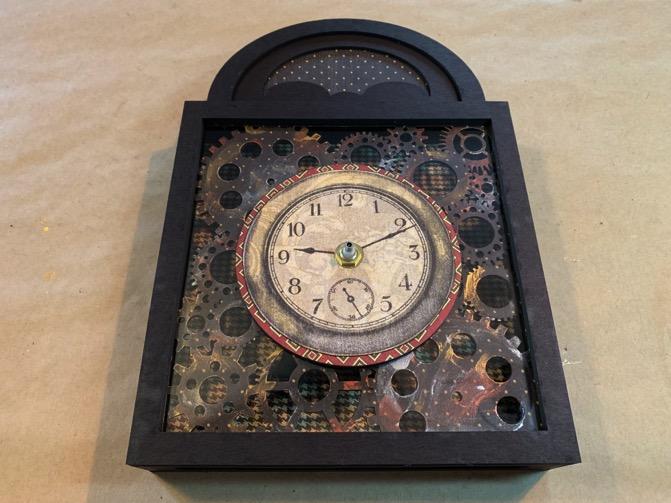
Apply glue to the backside of the clock frame piece and adhere to the front of the clock assembly.
GREAT!
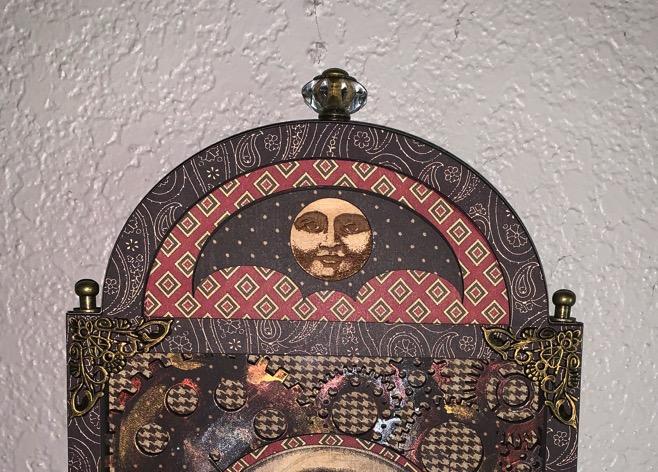
Now, cut the top scallop frame and adhere to it’s matching area on the top of the clock.
Adhere the moon face to the center of the scalloped area.
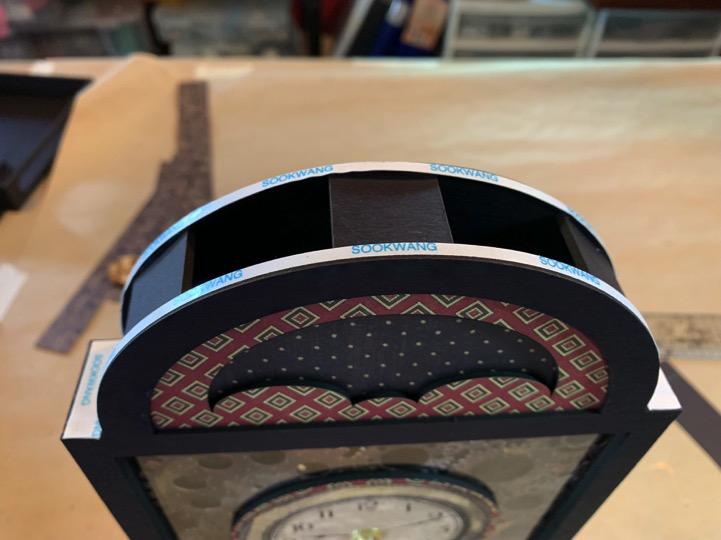
The Rounded Top-
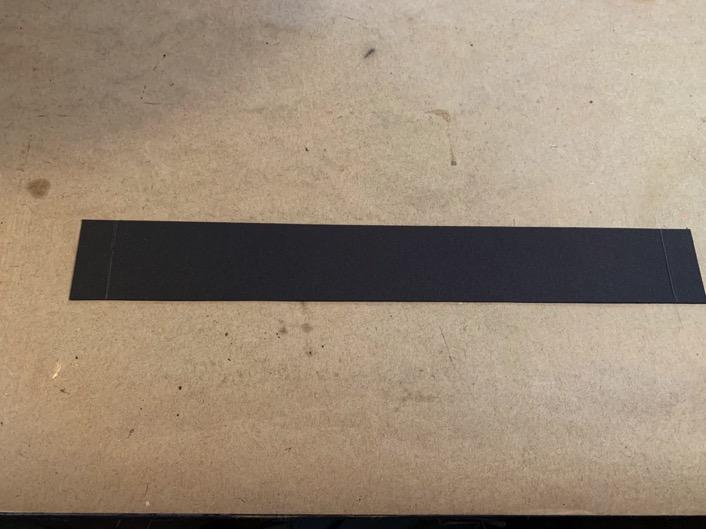
From Black Cardstock cut a piece that is 1-1/4 x 9-3/8-inches. Score the left and right edges by coming in a ½-inch on each end.
Set the strip aside for the moment and apply 1/8-inch Scor-tape to the top round clock top edges and burnish the tape into the top well. Apply tape to the (2) straight ends.
Pull the tape backing from all areas. Take the black cardstock trip and fold on the score lines. Place the ½-inch scored section down on top of the flat area to the left or right side and gently bring the paper over the top adhering to the top edges of the clock. End by adhering the reaming ½-inch scored section to the remaining flat side.
Awesome! Now to cover the project with paper!
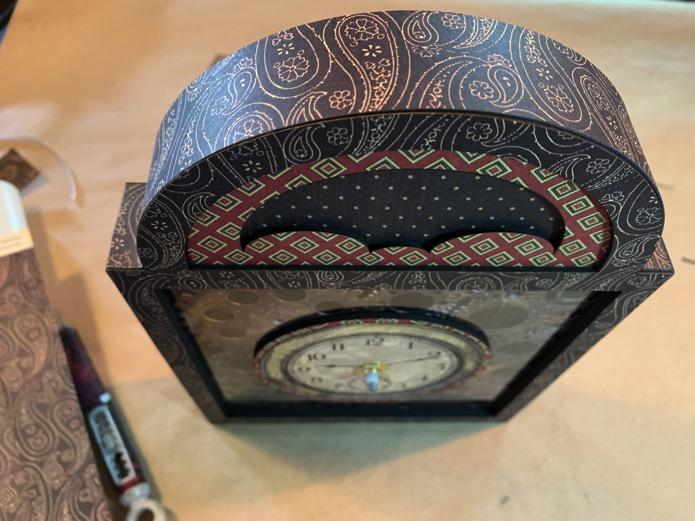
Covering the Exterior with Paper-
All the exterior sides are cut from Graphic 45’s “Dashing and Debonair” –The paisley side.
Cut the matching bottom and front frame papers and adhere to their respective areas.
From the Paisley paper cut (2) strips that are 1-1/4 x 7-1/8-inches and adhere to the left and right sides.
Again, from the paisley paper cut a strip that is 1-1/4 x 9-3/8-inches. Score the left and right edges by coming in a ½-inch on each end. Fold on the score lines. Adhere the piece over the black cardstock clock top.
Finishing Touches-
Open the package of Graphic 45’s Metal Corners. I used the flat ornate ones. Apply glue to the backside and adhere to the four corners of the Front Clock Face Frame. I added a bit of gold metallic paint to brighten them.
Adhere the hitch fasteners to the (2) front top corners and a knob to the top center for a finial.
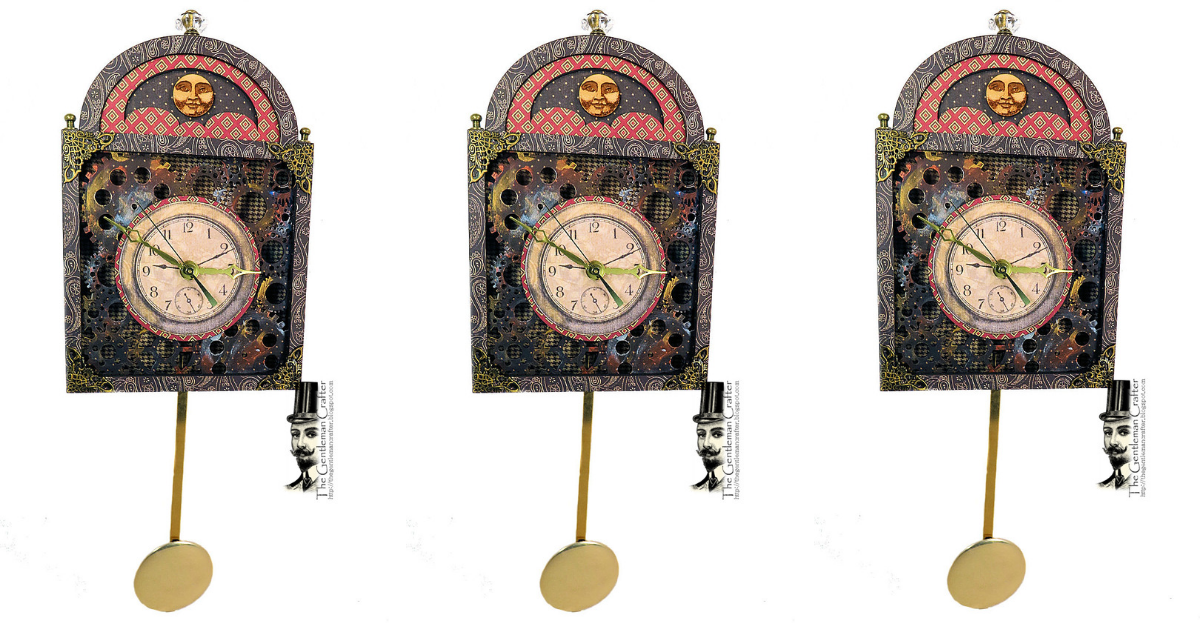
The Clockworks Movement-
Follow the manufacturer’s instructions on the back of the clock package to apply the hands, battery, and pendulum.
Just add a battery and hang from the pre-cut hole on the back top of the clock!
You Did It!!”
Printable Pendulum Clock Tutorial
http://www.TheGentlemanCrafter.com
It is just incredible to see the magic unfold! Let's give Jim a big round of applause for this step by step tutorial and amazing chipboard clock. We hope you are inspired to create your own clock. Thank you for joining us today for your daily dose of inspiration. Have a wonderful day, and as always…
Happy Papercrafting!


")