Hello, G45ers!
Let’s add some dimension and detail to your paper crafting projects with this brilliant #G45Technique – Paper Pleating. Today on the Graphic 45 blog, Lea Muskotevc aka Memories By Lea shares a step-by-step tutorial on how to create this classy scrapbook layout. This tutorial would look great with any coordinating pattern papers you have in your stash so don’t be afraid to follow along, and when you do be sure to share your work with us on Instagram using the #Graphic45 hashtag.
Ephemera Queen Layout
Featuring Paper Pleating Tutorial
By Lea Muskotevc aka Memories By Lea
“Hello, G45 crafters!
I like the look of 3D elements on my album pages. One of my favorites is Paper Pleating technique.
I usually add paper pleats under the photo. It creates an interesting visual layer of a skirt under the photograph. You just add a border, a bow, or a beautiful element to give your scrapbook page some extra elegance.
If paper pleating is something you would like to include in your layouts follow the tutorial below.
STEP BY STEP TUTORIAL:
Cut a piece of Les Chapeaux paper at 8.5×8.75’’. Cut a piece of cardstock ⅛’’ larger than the paper. Adhere the paper to cardstock and leave a border of cardstock around the paper.
Cut a piece of Treat Yourself paper at 3.5’’x8’’. Cut a piece of Ephemera Queen paper at
2 ⅛’’x 4.5’’. Cut (2) pieces of cardstock ⅛’’ larger than both papers.
Adhere papers to cardstock pieces and leave a border of cardstock around the papers.
Center Treat Yourself paper 0.5’’ from left and ⅜’’ from top edge of Les Chapeaux paper.
Center Ephemera Queen paper ⅝’’ from right and top edge of Les Chapeaux paper.
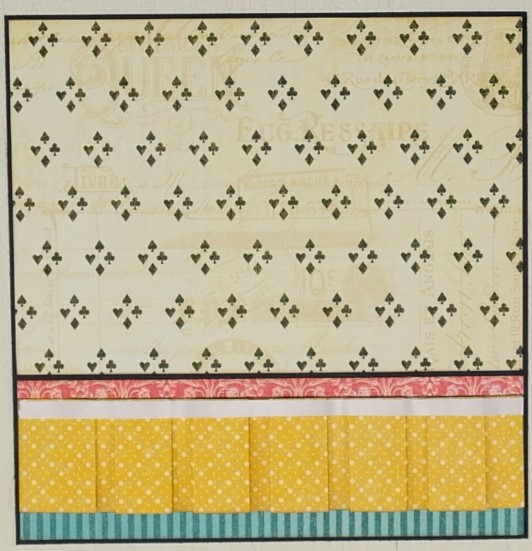
Cut papers:
Oh Happy Day: 6 ⅝’’ x4 ⅝’’
Ephemera Queen: 6 ⅝’’ x 2 ⅛’’
Les Chapeaux: 6 ⅝’’ x1 ⅞’’
Cut a piece of cardstock and adhere Oh Happy Day and Ephemera Queen papers to cardstock as seen in the picture.
Take a les Chapeaux paper and adhere it to Ephemera Queen paper. Line bottom edges of both papers.
Cut a strip of Simply the best paper. Score the strip at 1’’, 1.25’’, 2’’, 2.25’’, 3’’, 3.25’’, 4’’, 4.25’’, 5’’, 5.25’’, 6’’, 6.25’’, 7’’, 7.25’’, 8’’, 8.25’’, 9’’, 9.25’’, 10’’, 10.25’’, 11’’, 11.25’’.
Fold on the score lines by folding the first score back and the second forward, then the third score folds forward and the fourth should fold back. Repeat this pattern to form the pleats.
Glue pleats in place.
Align folded pleats with the upper edge of the Les Chapeaux paper. Trim sides if needed and adhere them to paper.
Cut out a border from Oh Happy Day paper. Align the border with the upper edge of the pleats and adhere them down.
Cut out an image from the Oh Happy Day paper. Adhere the image to a piece of cardstock and center it on the middle section of the pleats.
I hope you enjoyed the tutorial.
Thank you for stopping by!” ~Lea
Graphic 45 Supply List:
Ephemera Queen Collection Pack
Other Supplies:
Black cardstock
Ephemera Queen by Graphic 45 Collection Review
Happy Papercrafting!
Want even more Graphic 45? Sign up for our newsletter here!