Hello, G45ers!
It is begining to look at lot like Halloween! It is time to pull out your papers and scissors and make your own Halloween Home Decor. Take note of Brand Ambassador, Gloria Stengel's step by step tutorial on how to take dusty old books and upcycle them to create a delightful decoration that would look great as a centerpiece, on a mantel or shelf. Gloria has used our Magic of Oz – Deluxe Collector’s Edition (back in stock!) to celebrate this upcoming holiday.
#G45Holiday – Scarecrow Fall Home Decor
“Hello, G45 Fans! It’s Gloria with you today! Raise your hand if you are ready for fall! Fall comes slowly here in southern California if it comes at all. I dream of cooler days and crisp nights, which may arrive sometime in December! I decorate my house for fall as soon as the calendar says “first day of autumn” no matter the hot weather!
I have created a cute scarecrow table decor piece from a few old books and the adorable Magic of Oz Deluxe Collector’s Edition. This piece requires very little in the way of supplies. You need some old books, the Magic of Oz collection pack, some ribbon, a piece of black cardstock, and your favorite adhesive.
Let’s get started!
You will need three old books, each approximately 8-10 inches tall, and about 1-2 inches thick. I chose two books of about the same size and one a little larger. You can create your book stack any way that you wish, and make it as tall as you wish.
Tip: You don’t really need “old” books for your “old books” project! You can use outdated textbooks, self-help books that were not much help, or even current books that are not really worth re-reading or passing on. There is a lot of garbage published these days, and I like to give these poorly written books some new life! You can find hardcover books at your Friends of the Library store, at yard sales and swap meets, at second hand stores, or in the back of your closet!
If you wish, you may ink the edges of your books with black archival ink. One of my books had a tan cover, so I inked it. The other two had dark covers so I did not bother. I also smudged some ink onto the edges of the pages.
Tip: Many hardcover books have a dust cover. Once that is removed, there may be a really pretty cover that you can use as is. You can also paint the book covers or use mixed media techniques to “jazz” them up!
We will cover our books with pretty paper. Trim Magic of Oz papers to the height of your books and wrap them around the cover. Use your favorite adhesive to secure the paper to the covers. It does not matter if the paper does not fully cover the back of the books since no one will ever see the back. The back becomes the bottom of each book. (I used Magic of Oz Parcel Post (reverse) and Poppy Fields to cover my two smaller books.)
Tip: Since Graphic 45 paper has a white core, ink the edges of your paper with an ink that matches the theme or tone of your project.
Once you have two of your books covered, glue them together (or use a strong double-sided tape).
Wrap a length of ribbon around the right edge of the stacked books, securing the ribbon on the bottom. I used a piece of green wire-edge burlap and a piece of green and ivory gingham.
Wrap the largest book with paper and glue the stacked books to the top. (Please note that I originally glued a chipboard phrase to my bottom book, but I changed my mind and removed it later.) I used Emerald City (reverse) to wrap the bottom book in the stack.
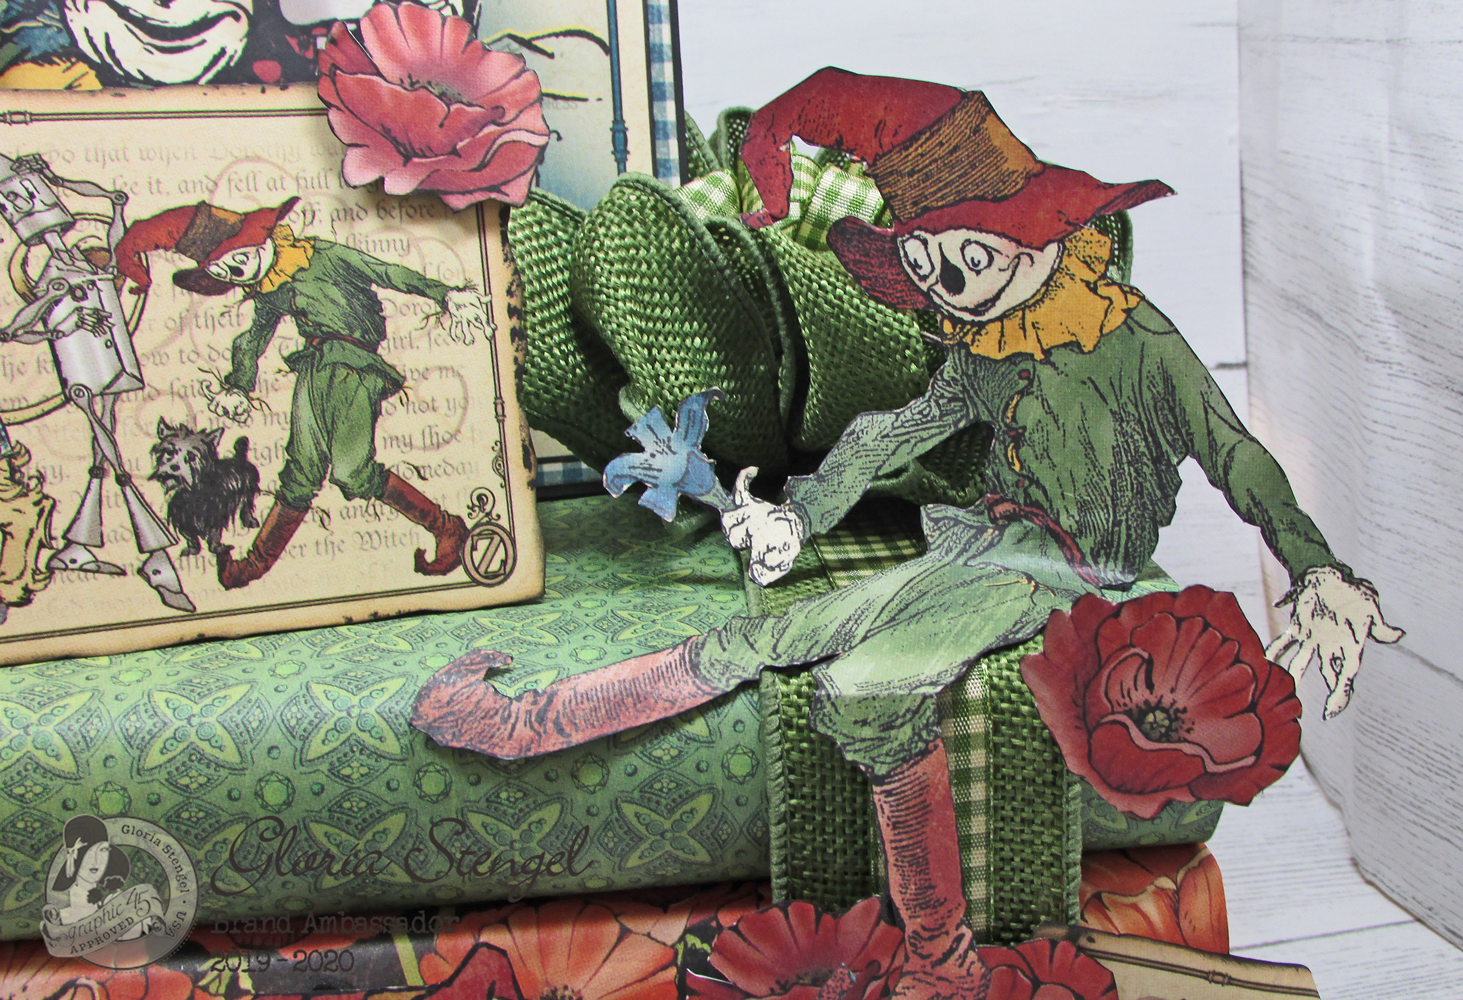
Use sharp scissors and a craft knife to fussy cut images from the Signature sheet and Scatterbrained Scarecrow sheet. Rub all the edges with black ink or a black marker. Set the images aside.
Tip: Small, sharp scissors are necessary when cutting intricately printed images from the paper sheets. If you are skilled with a craft knife it is very helpful for getting into hard to reach places. To help the pieces look finished, hold each piece with the right side facing away from you, and run a black, brush tip marker around all the edges.
Cut black cardstock to 12” x 6” and score at 6” to make a 6” x 6” top-fold card. Trim Yellow Brick Road (reverse, blue gingham) paper to 5 ⅞” x 5 ⅞” and attach to the card front. Trim the image shown from the There’s No Place Like Home paper to 5 ½” x 5 ½” and attach to the card front.
Trim a piece of black cardstock to 4” x 6” and score at 1” and 3” on the short side. Place adhesive onto the two smaller sections. Score and fold so that the adhesive is on the outside.
Attach the piece of black cardstock from the step above onto the inside bottom edges of your card to create a triangular stand out of the card.
Glue the bottom of the card/stand to the top left of the book stack, as shown.
Use foam adhesive to add a fussy cut scarecrow to the left edge of the 6×6 card. Add a few crows to the top edge of the card, as shown.
Trim a piece of black cardstock to 1” x 4” and score at 1”, 2”, and 3”. Fold the piece to make a triangular “stand.”
Glue the scarecrow image to the triangle, as shown. Make sure to glue the stand to the scarecrow's midsection.
Glue the scarecrow in a sitting position to the front right of the book stack. The little cardstock stand will help the image to sit up properly.
Glue some fussy cut flowers below the sitting scarecrow’s feet and to the right edge of the top book in the stack.
Trim the image shown from the Journey to Oz sheet. Use a silver gel pen to add some sparkle to Dorothy’s silver slippers and her wand. Rub the edges with black ink.
Fun Fact: Did you know that Dorothy’s slippers are silver in the book The Wonderful Wizard of Oz by L. Frank Baum? They were changed to ruby slippers for the movie version to take advantage of the new (at the time) Technicolor process. Graphic 45 goes back to the original book and shows Dorothy in silver slippers.
Cut a piece of black cardstock to 7” x 4 ¼”. Score from the top at 1”, 3 ½”, and 6”. Fold the cardstock to make a triangular stand.
Glue the stand to the left front of the book stack.
Attach the image to the front face of the stand. Add a fussy cut flower to the upper right corner of the “friends” image.
Add another scarecrow to the center book (use the reclining scarecrow). Add the Magic of Oz banner to the bottom book.
Add an image cut from Journey to Oz paper to the right edge of the stack. Glue various fussy cut flowers to the project as desired.
Create large bows from the green burlap and the green plaid and glue them to the right side of the book stack, as shown. Fluff the bows as desired.
Feel free to add paper to the back of the card stands as you wish to have a finished look, especially if the back of the project will be visible.
Feel free to add other fussy cut images to the project, or you could add pre-made flowers or other embellishments. Make the project your own! You could even experiment with a different paper collection!
Once all the items are added, this home decor piece is approximately 11” tall, 9 ½” wide, and 6 ½” deep. It is a very substantial piece and would look grand on an entry table or sideboard!
Thanks for looking!”
Graphic 45 Supplies Used:
Magic of Oz – Deluxe Collector’s Edition
Other Supplies Used:
Black cardstock
Ribbon
Adhesive
Silver glitter pen
Old books
Black archival ink
We hope you have enjoyed this step by step tutorial. Be sure to leave a comment below letting us know what paper collection you would use on your upcycled home decor book project. Have a wonderful weekend and as always…
Happy Papercrafting!