Tis the season for some holiday fun! Today on the Graphic 45 blog, Brand Ambassador, Cal Summers shows us how to #G45LeveledUp one of our pre-made Trifold Waterfall Folios. Cal’s ‘Twas the Night Before Christmas Folio has two added windows, one with dimensional fussy cut pieces and one sequin shaker. Plus, she has added extra pockets, and photos mats. Grab a cup of hot cocoa and enjoy this video tour and folio tutorial.
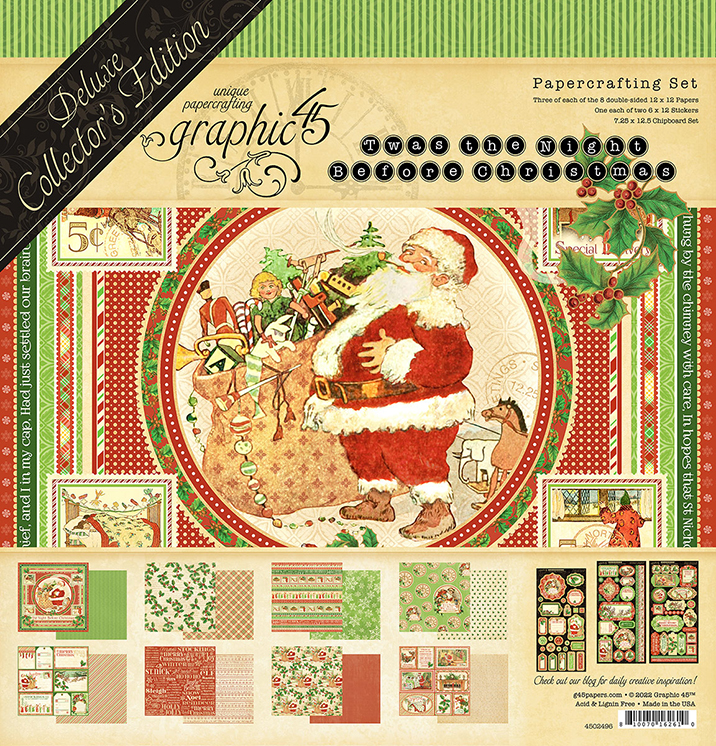
“Hey G45ers – Christmas is coming and I couldn’t be more excited – I love Christmas so much and one of the highlights for me is finding out what the Graphic 45 Christmas Collection will be! This year we are spoilt with three in total – but for my #G45LeveledUp project I’ve chosen the Deluxe Collector’s Edition of ‘Twas the Night Before Christmas.
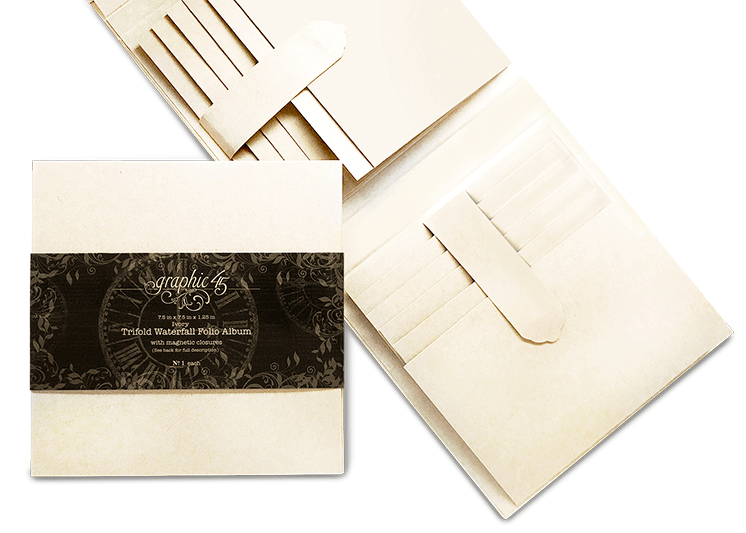
I’ve taken a previous #G45AlbumKit and put my own spin on it. I’ve chosen the beautiful Couture Trifold Waterfall Folio because it caught my eye with its extra pockets and the wonderful folio base.
Christmas Shaker Folio – Twas the Night Before Christmas – by Cal Summers
For my version I wanted to add a shaker and a layered cover which meant that I needed more spine than I had – so I cut my folio apart and I’m going to tell you how I put it back together with all the elements I wanted to add.
Firstly I cut my folio down the centre of the two spines so my mini was in three pieces. I wanted my folio to lie flat like the original but adding in the extra pockets and my shaker meant to would have a serious case of alligator mouth – and I didn’t want that look for this project.
I then cut five pieces of super thick greyboard/chipboard at 7 x 7 inches and cut a ¾ inch frame into those. I then glued three together on top of each other and then two together. The first one to be my cover and the second my shaker. For both I added my patterned paper directly onto the folio and then glued the frame on top (the three one for the cover and the two for the shaker). I added inside the frame either my layered up fussy cut Santa image from the Signature sheet or some sequins and chipboard buttons and then added an acetate cover on top with super sticky tape.
I’ve decorated up both of the waterfall elements just as they are – with patterned paper on one side and room for my photos on the back. I’ve added a cut apart on the front of both for added interest.
The next thing I did was to make a second set of pockets to add to the front of the large pocket that forms part of the Trifold Waterfall Folio. I made two flapped inserts to fit inside those and one supersized inserts with pockets to go inside the large original pocket. All the measurements you need for this are in a special cutting guide you can download at the end of this post.
The next thing to do is to put our folio back together. I made two new spines out of greyboard/chipboard and cardstock and glued those onto the original spine with a small gap that meant my folio had extra pine space allowing it to sit flat. You can just see the gap in this photo – but I’ve covered the cut edges of the original folio so it barely shows and adds a “design feature”!
I finished off by decorating the inside cover and adding my own photomats. Finally I made a charm using chipboard pieces from the collection I covered with patterned paper on the back.
I’m happy that I made my spines wider but if you are worried about cutting up your folio, just add a shaker on the front and a thinner decoration on the inside gatefold. With Graphic 45 papers it’s bound to look amazing whatever you decide!
Thank you for joining me today – and happy crafting!”
Graphic 45 Trifold Waterfall Folio Album
Patterned paper – I used 12 x 12 Twas the Night Before Christmas DCE with
Two sheets of acetate approx 7 x 7 inches
Thick greyboard/chipboard – five pieces at 7 x 7 inches approx – I used 2250
micron thick
Cardstock to match the colour of my Trifold Folio
Sequins and sparkles for shaker
Chain, jump rings and a charm hanger for my charm
Trifold Fashion Folio Tutorials – Couture – Album Kit Vol 05 2022
Want even more Graphic 45? Sign up for our newsletter here.


2 Responses
Leave it to you, Cal Summers, to work your magic on a Trifold.. I think this is fantastic and #Graphic45 made one of the best decisions in choosing you for an ambassador!!!
Agreed! Cal is a star!